
TL;DR
- Content Aware Protection allows Administrators to set up and enforce strong content filtering policies for selected users, computers, groups, or departments and take control over the risks posed by accidental or intentional file transfers of sensitive company data.
- Controls can be placed around predefined data (for example, PII, PHI, email addresses, passport numbers, credit card numbers, etc.) or custom data (accounting documents, technical data, customer databases).
- CAP policies can be applied to monitor various exit points, including portable storage devices, network shares, email, transfers to cloud file services, printers, etc. It can also be used to prevent sensitive data from being captured via a copy and paste and screen capture.
- We recommend building a “Report only” policy first. This will allow you to monitor how files/data are being used across endpoints. This will help to ensure blocking policies are effective without damaging productivity.
Content Aware Protection (CAP) is one of Endpoint Protector’s key modules. As data is moved from the employee endpoint to cloud applications and USB drives or through email and enterprise messaging applications, CAP inspects the content to ensure it doesn’t breach your data protection policies. For example, you may want to restrict employees from sharing customer PII via email or being able to upload it to cloud storage services. CAP can also prevent transfers via copy and paste and print screens.
In this Academy Guide, we’ll cover the basic settings and how to get started with Content Aware Protector.
To best understand Content Aware Protection (CAP), consider this module similar in behavior to an Antivirus’ Active Scan feature. CAP is looking at file activity as it happens and checking the content to ensure any sensitive data subject to a policy is not moved beyond the employee endpoint.
Just like a Device Control policy, a CAP policy continues to protect the endpoint even when it’s offline.
Before launching Content Aware Protection, we always advise starting out with a “Report only” Content Aware Protection Policy. This is your first step in understanding the movement of files across your endpoints and the topic of this Academy Guide.
Build a CAP report to understand file movement
Create a “Report only” CAP policy by navigating to Content Aware Protection > ‘Content Aware Policies.’
Click the ‘Create Custom Policy’ button, define the OS Type, provide a Policy Name (it is suggested to include “Reporting” or “Report only” within the Name or Description), and be sure to select Report only for the ‘Policy Action:’ field. Scroll to the bottom of this page and choose the Save button – this action will return you to the policies viewing window. If you manage more than one Operating System type in the environment, follow this same procedure to create the policy framework(s) for the other platform(s).
After your Report, only policy framework(s) has been established, select your first policy within the window and choose the icon for edit. This ‘Edit’ icon can be found on the right-hand side of the policy (look for the pen and paper icon). This will bring you back to the ‘Edit Policy’ page, where you will select the Exit Points of focus and the items you may later deliver blocking restrictions against.
Note – the terminology used in this policy is ‘Denylists,’ but you are implementing no restrictions. Since the CAP feature module focuses on in-motion objects, it consumes minimal endpoint resources. Also, it is best to set only the variables found in a given environment where agents are to be installed. This will ensure no unnecessary processing takes place at the point of detection.
The Applications tab under ‘Exit Points’ is commonly used for common email clients and/or web browsers in a given environment. It also allows you to monitor enterprise messaging apps and file-sharing services. Alongside this, the Storage Devices tab can be used if you intend to later restrict the transfer of sensitive files to storage media.
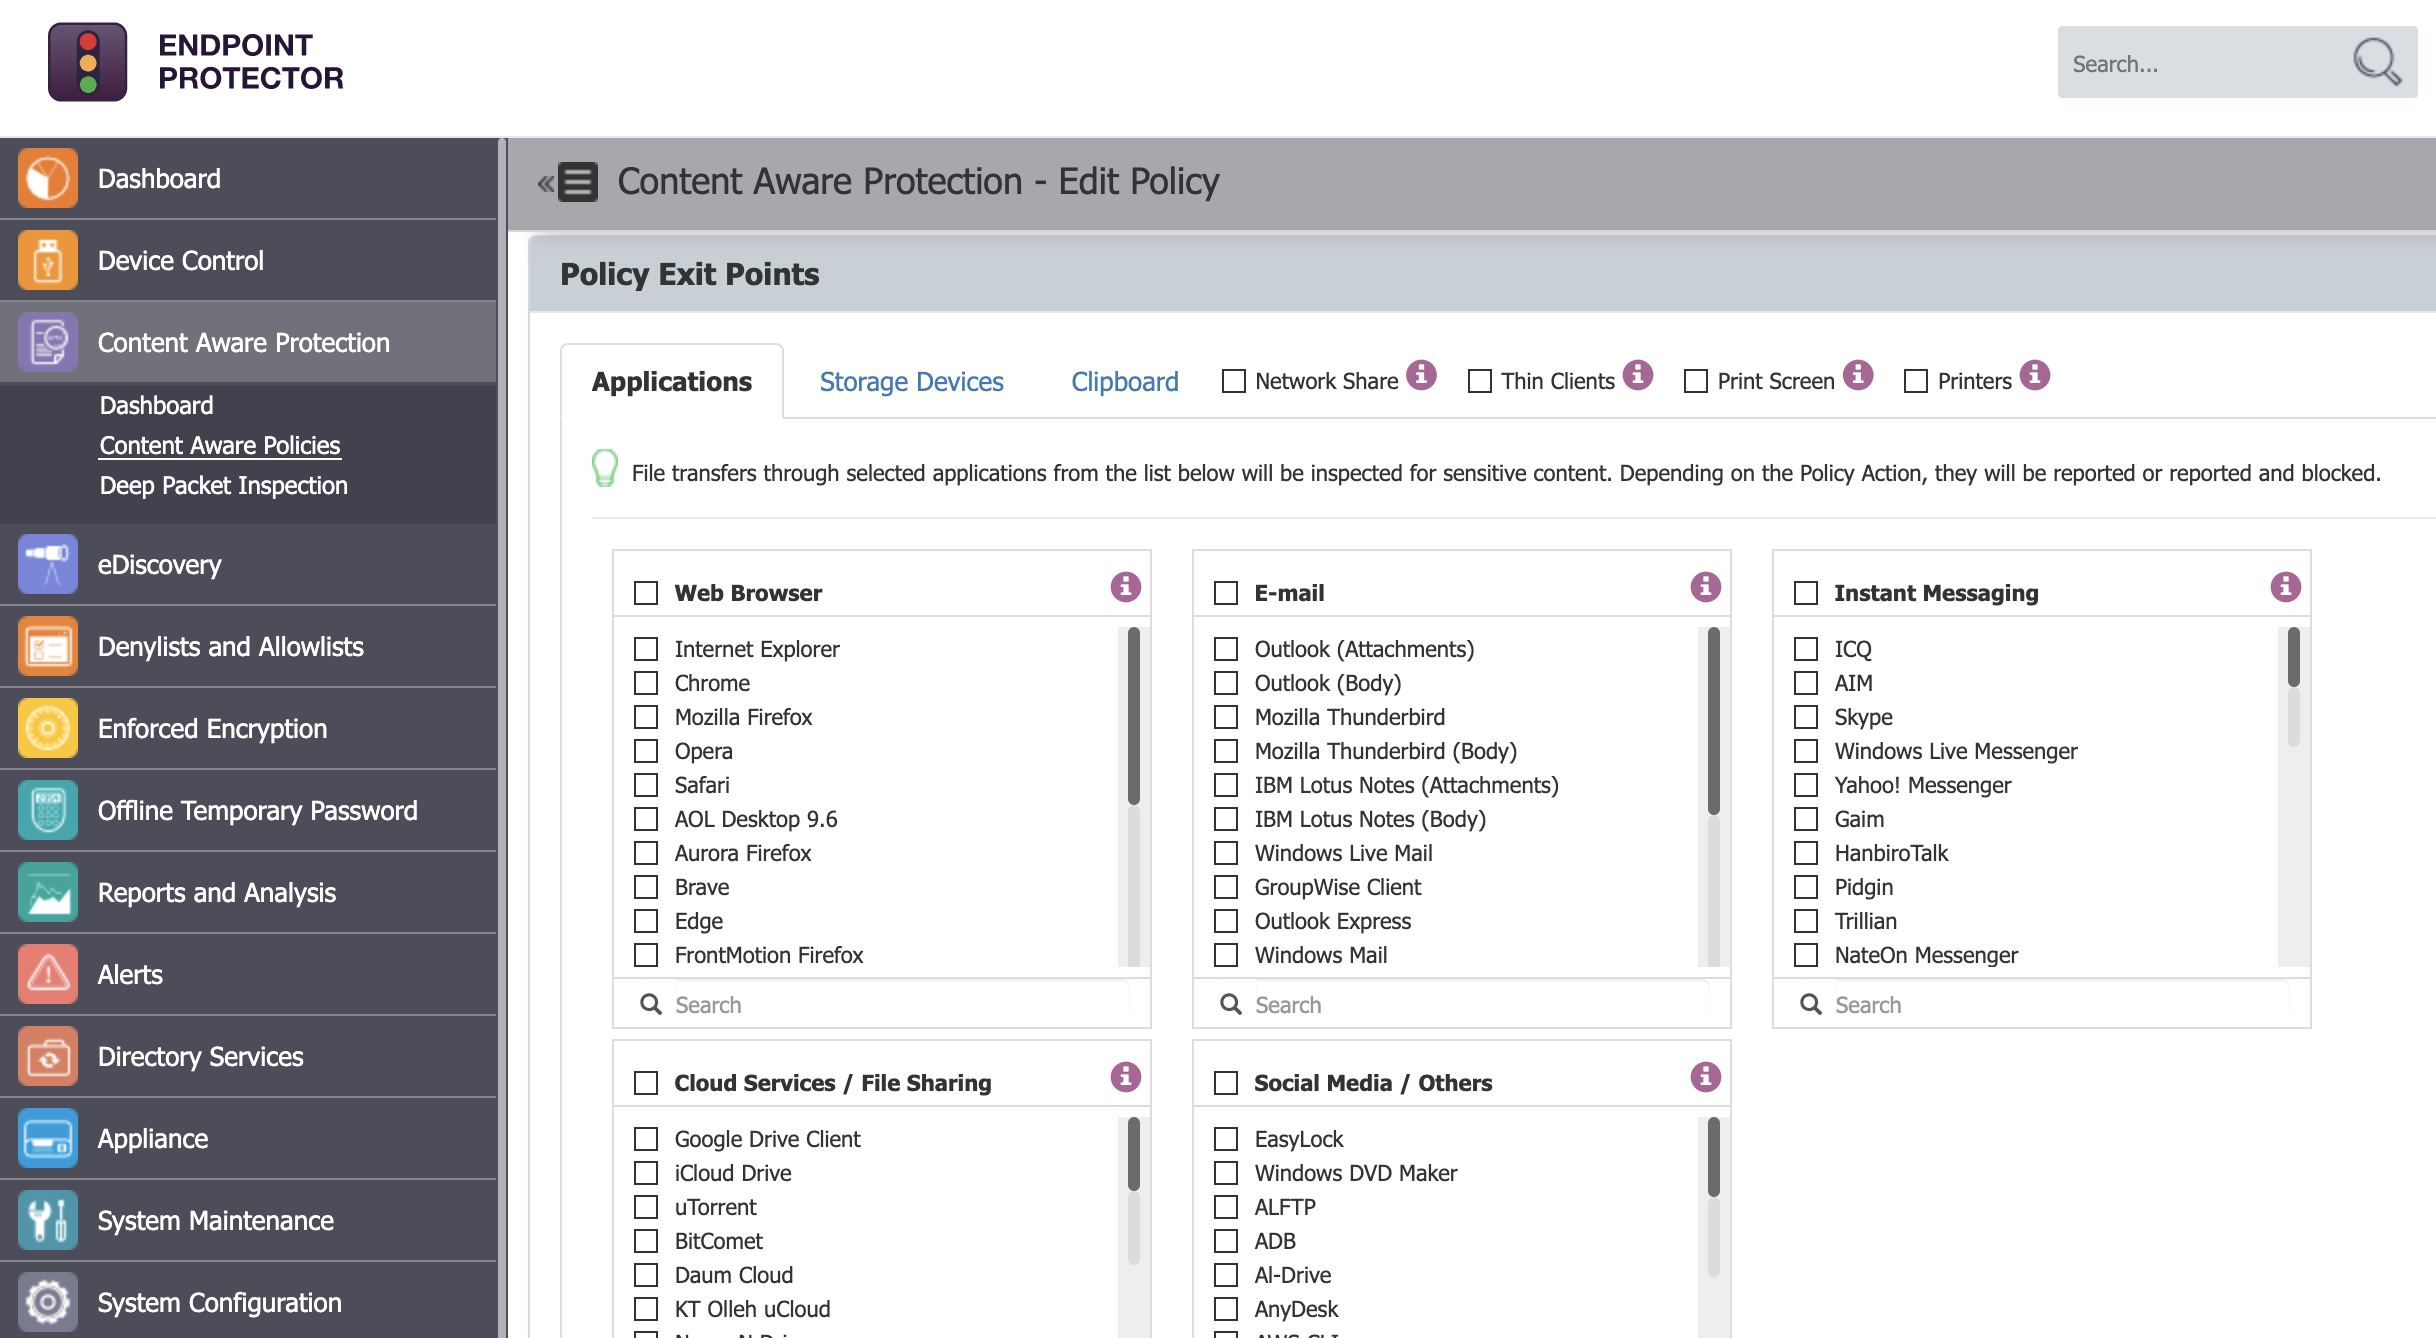
Click the image for full resolution.
The Denylists section provides methods for determining which objects to focus classification and determination on. If it is desired to audit activity around given files, the ‘File Type’ tab will provide several options for common files types in systems. If the focus is more regulatory-bound, using the ‘Predefined Content’ tab may be more appropriate.
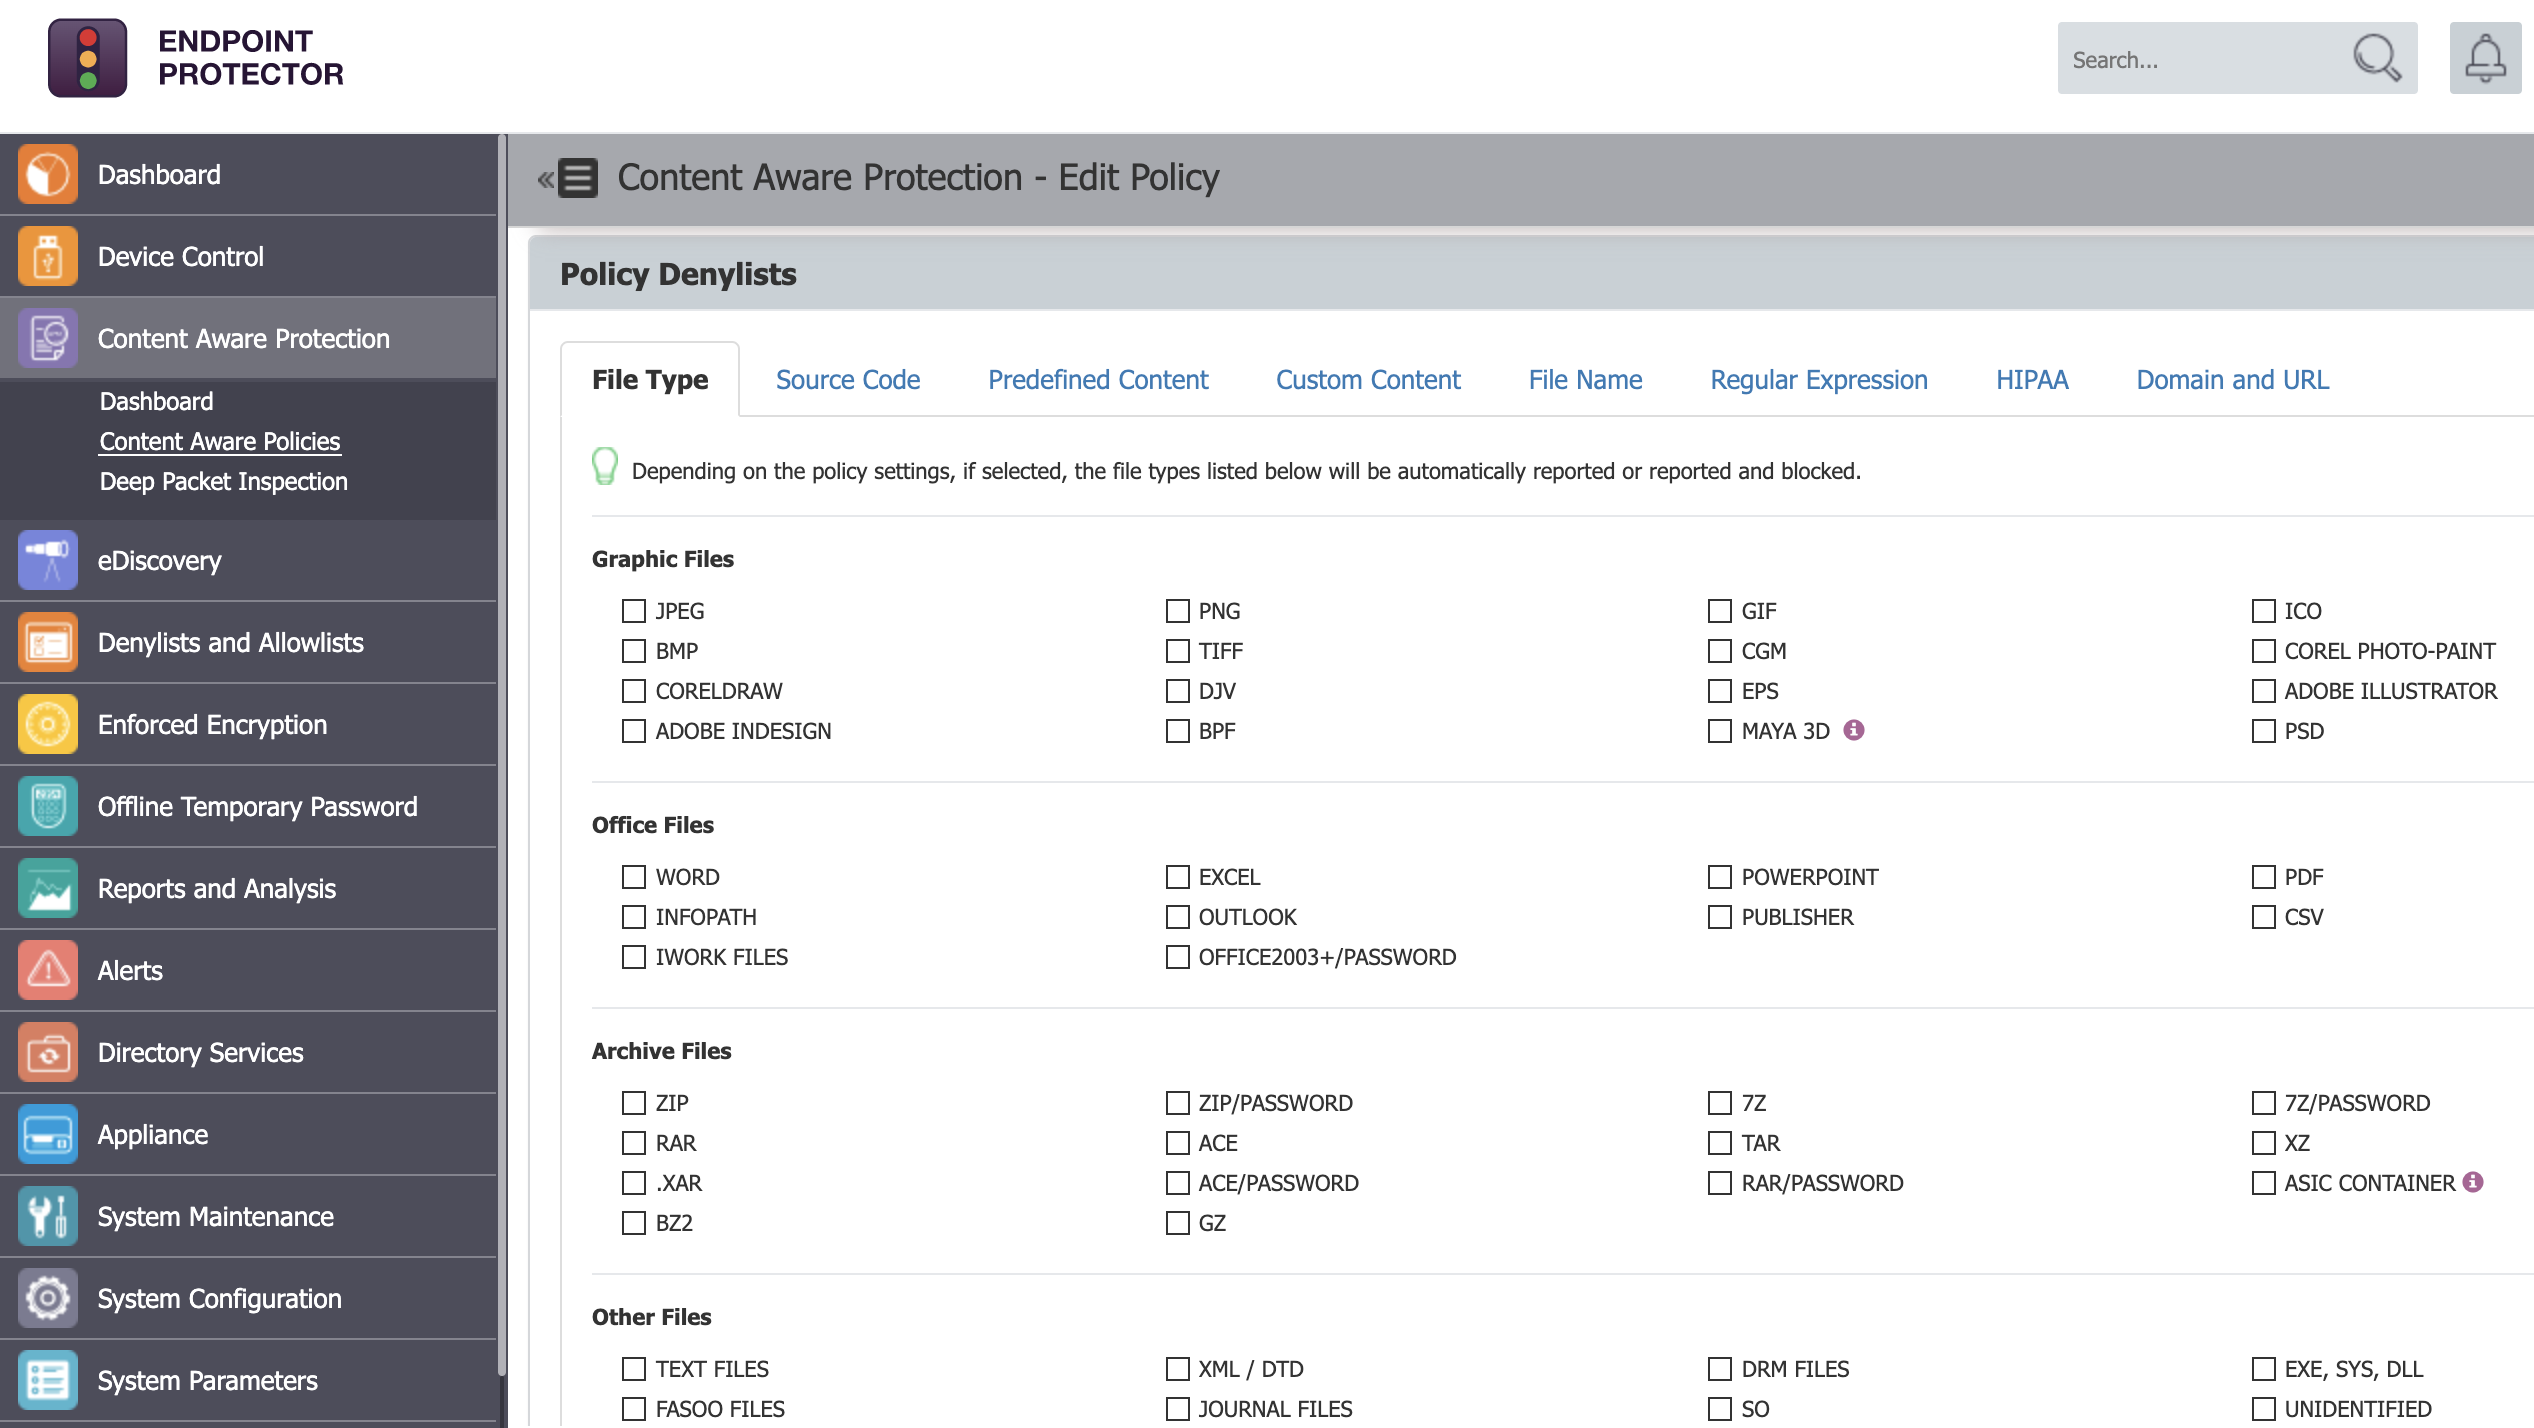
Click the image for full resolution.
If true customization is required, the ‘Custom Content’ tab allows for mapping of items such as list file entries, or the Regular Expression tab allows for the use of logical operators.
A best practice with regards to your Denylists selection may include Credit Card Numbers (CCN), Social Security Numbers (SSN), or even Personal Identifiable Information (PII). Under the Sample Data section, sample entries or files can be found at the site: DLPTest.com (https://dlptest.endpointprotector.com).
At this point, you can scroll to the bottom of the Policy edit page and choose to Save again – do this for each “Report only” policy created.
Predefined Policies vs. Custom Content
Using Endpoint Protector’s ‘Predefined Policy’ option lets you focus attention on specific file types or data tied to particular regulatory items (such as HIPAA, PII, PCI-DSS, etc.). Depending on the Operating System in your environment, policies can be built for each of your Windows, macOS, and/or Linux systems.
If there is a need to look at specific items such as list files, ‘Custom Content’ can be entered or imported. Once the ‘Custom Content’ is added, this can be linked to a policy under the ‘Custom Content’ tab within the relevant entry.
After a policy is created, it needs to be assigned to a target. The target can be either Departments, Groups, Computers, and/or Users. To see the assigned targets of a Content Aware Protection policy, select the policy within the Content Aware Policy module of Endpoint Protector and scroll to the bottom of the page. Should there be a need to make an edit, be sure to click the ‘Save’ button found just below the section to define the policy’s target.
Transition your CAP reports to a Blocking Policy
After reviewing your CAP report and understanding the types of data being moved from employee endpoints, you’ll be ready to apply a blocking policy.
Begin by cloning your “Report only” policy(s). Locate each “Report only” policy under Content Aware Protection > ‘Content Aware Policies,’ and choose the ‘Duplicate’ icon found on the right-hand side of the policy. The second icon is seen in the three displayed icons column, which appears upon policy selection.
After duplicating and creating each of the policies intended for Blocking, choose to edit these policies by using the ‘Edit’ icon found just above the ‘Duplicate’ icon. Modify the ‘Policy Action:’ selection to the desired Blocking method within each policy. Keep in mind that “Block and Remediate” requires a Premium License package. Scroll to the bottom of each Policy page and verify all intended Policy Entities are selected, then click the Save button. After reviewing each new “Blocking” Policy, toggle the “Report only” policies to OFF.
Need help?
If you’d like further information and guidance on setting up Content Aware Protection (or enabling it on your account), please reach out to your Customer Success Manager or contact our support team here https://support.endpointprotector.com/hc/en-us/requests/new.
Download our free ebook on
Data Loss Prevention Best Practices
Helping IT Managers, IT Administrators and data security staff understand the concept and purpose of DLP and how to easily implement it.


